Wednesday, July 21, 2010

Pesto time! ...and my first attempt at 'process photos'

mmmmmm, my basil plant was gloriously full of fragrant leaves, I scored pine nuts on sale and a small wedge of real Parmisiano Reggiano, it is most definitely pesto time!  My food processor is packed away in storage, so I was going to make pesto by hand chopping, but I wasn't thrilled with the texture the last time I tried hand chopping.  Luckily, I stumbled across a post here: whocookedwhat.blogspot.com/2009/04/i-make-pesto-all-time-and-it-is-so-easy.html where an immersion blender was used in place of a food processor.  This worked so much better than hand chopping- and I can't imagine a food processor making it any better.  I can't give a true recipe here, I didn't (and usually don't) measure ingredients for pesto. Also, I didn't add garlic, I just didn't have any on hand.  So here is the process I followed:
warm fuzzies!

I didn't wash the basil because I grew it with no pesticides, so I just picked all of the lovely leaves.  My hands and kitchen smelled divine!
toasty!
toast some pine nuts- I used about 2 1/2 oz because I had a lot of basil, probably 5 full cups of packed leaves
mmmm, parmisiano!

let the pine nuts cool and grate some good parmigiana reggiano, at least 1/2 cup.  Once the pine nuts are cool, place a small handful of basil in a mixing bowl, add about a tablespoon of pine nuts, a good pinch of parmigiana and a drizzle of olive oil.  Use your immersion blender to squish and blend the ingredients.  It is a little difficult in the beginning, but will get easier as you add more stuff.  Just keep adding a bit of each ingredient and blend/squish.  The first handful or two got mushed up and kind of stuck in the 'vents' of the blender, if this happens just add a bit (light drizzle) of olive oil.  By adding ingredients a handful at a time, some of the basil and pine nuts get completely pulverized into paste, but the latter ingredients get chopped a bit less, leaving you with (imho) perfectly textured pesto.  Not chunky, that would not be right, but not a smooth paste either.
ready for the beauty shot!


Place in a bowl, a final dusting of cheese and drizzle of olive oil and ...."Oh Interwebs, when will you invent smell-o-vision links"?!
someone hand me a breadstick, stat!

Saturday, July 17, 2010

charming...

I really love the way this little powder room curtain turned out.  It is pretty rare that a project turns out exactly as I picture it in my head when casting on.  Lacy and beaded and just so pretty!
The pattern is available as a free Ravelry download named Candlestick Curtains by Carol Shoenfelder

Saturday, April 03, 2010

so, okay, I'll never be a chocolatier, however...

these were so much fun to make!


walnut coconut creams, covered in white almond bark, with adorable chick faces and feet fashioned from various candy sprinkles. I stole the idea for the chick faces from "http://cakeonthebrain.blogspot.com/2010/03/easter-chick-cake-balls.html


I also made some caramel, wrapped it around pretzel rods, then went nuts with chocolate and sprinkles. mmmmmmm, D is very very happy with these. He doesn't have much of a sweet tooth so when I hit on something he loves it is a treat for me!


funny story about the chick faces.


Cake on the brain used a food marker to make the iris part of the eyes. I couldn't find a food marker at the 2 stores I needed to go to for other groceries anyway, so I spent quite a bit of time, almond bark and toothpicks experimenting with different ways to make irises. I realized I had spent too much time with candy poultry when I sat frustrated looking at my few paste/gel food colors thinking, "Brown! that is what I need. darn, I wish I had brown. Brown would work well." sitting about 10 inches to my left was the leftover chocolate from the pretzels. It was the perfect brown. :)

Tuesday, March 09, 2010

early spring in the garden

mmmmmm....days like today are the perfect reason to have a garden.  1-2 hours in the afternoon sun pulling up old tomato canes, twisting metal cages back into shape, brushing away straw to see what did or didn't survive the winter, days like today are worth their price in gold.  My perfect escape.
This year the garden held a few surprises.  Among the dead vines & branches there are so many fallen/rotten tomato carcasses that I'm going to depend on volunteer tomatoes this year rather than plant new.  I'm telling myself that I'm being frugal rather than lazy. 

I wish I could remember if this sad survivor of winter 2009/2010 is a broccoli or a cabbage.  I think it looks like cabbage, but I could swear that is where I planted the broccoli.  Either way, this little plant kinda looks the way I feel most days.  Badly injured but still alive.  The eternal optimism of Spring, right here in my own backyard. 

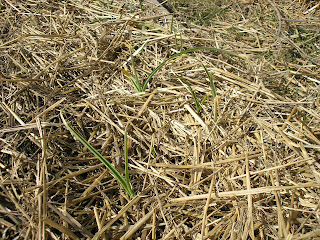
and wonder of wonders...Garlic!  lovely, green, smelly garlic!  Looks like most of the  garlic that I planted last fall survived.  Before I get too excited about my gardening prowess let me step in and remind myself that garlic has been cultivated for a very long time.  And they won't be ready for harvest till Summer.  but still. 
There is such comfort in plant, wait, harvest.